관습적으로 폴더 분리할 때, services는 데이터 처리, screens는 UI를 담당한다.
기초 개념
class는 청사진이다. flutter에서 거의 모든 것을 만들 때 이 청사진을 사용한다.
object는 실제 만들어지는 제품이라고 생각하면 된다.
class는 두가지 중요한 것이 있다. 바로 properties와 method이다.
차로 비유하면 properties는 차의 색깔, 좌석수 이런 것이고, method는 drive(), break() 같은 것이다.
class Car {

int numberOfDoors = 5;

	void drive (){
		print('wheels start to turing');
	}
}
변수도 class안에 들어가면 property라고 불리고, 함수도 class안에 들어가면 method가 된다.
여기서 class를 object로 만드는 방법을 알아보자.
Car myCar = Car();첫번째 Car는 타입으로 클래스의 이름을 써준다.
두번째 myCar 같은 경우는 이름을 뜻하고,
세번째 Car() 같은 경우는 이제 진짜 object가 만들어지는 것이다.
void main(){

Human jenny = Human(startingHeight:15);

print(jenny.height);

jenny.talk('why is the sky blue');

}


class Human{

  double height;
  int age = 0;

    Human({double startingHeight}){
    	height = startingHeight;
   }

    void talk(String whatToSay){
     print(whatToSay);
     }

 }
느낌은 대충 알겠다. 아무튼 class는 뭔가 압축된 대략적인 진짜 청사진 같은 거고.
geolocator 불러오기
자세한 사용 방법은 아래 링크를 참조한다.
https://pub.dev/packages/geolocator
geolocator | Flutter Package
Geolocation plugin for Flutter. This plugin provides a cross-platform (iOS, Android) API for generic location (GPS etc.) functions.
pub.dev
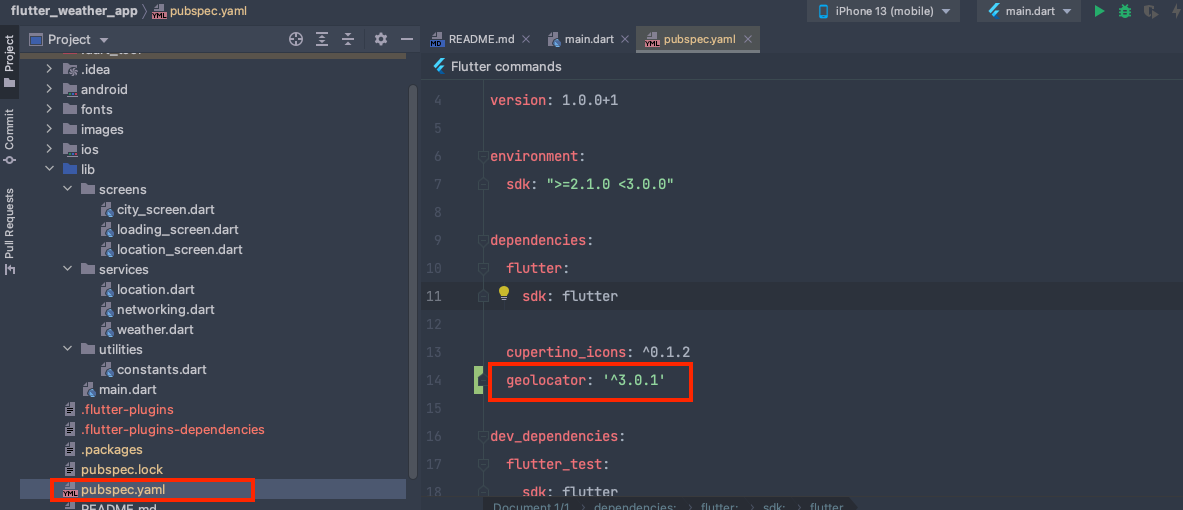
pubspec.yaml 파일로 가서 geolocator: ^3.0.1을 입력해준다.

그리고 Pub get을 눌러주면 자동으로 패키지를 다운로드 한다.

import 'package:geolocator/geolocator.dart';void getLocation() async{
Position position = await Geolocator().getCurrentPosition(desiredAccuracy: LocationAccuracy.low);
}위에 코드를 다음과 같이 입력해준다.
LocationAccuracy.low를 하면 근거리에서 gps를 잡는다. (high도 물론 있다.)
유저에게 위치 정보 허용 받기
Android

AndroidManifest.xml 파일안에 <mainfest> 태그 안에 다음과 같이 작성한다.
<uses-permission android:name="android.permission.ACCESS_COARSE_LOCATION" />
ios
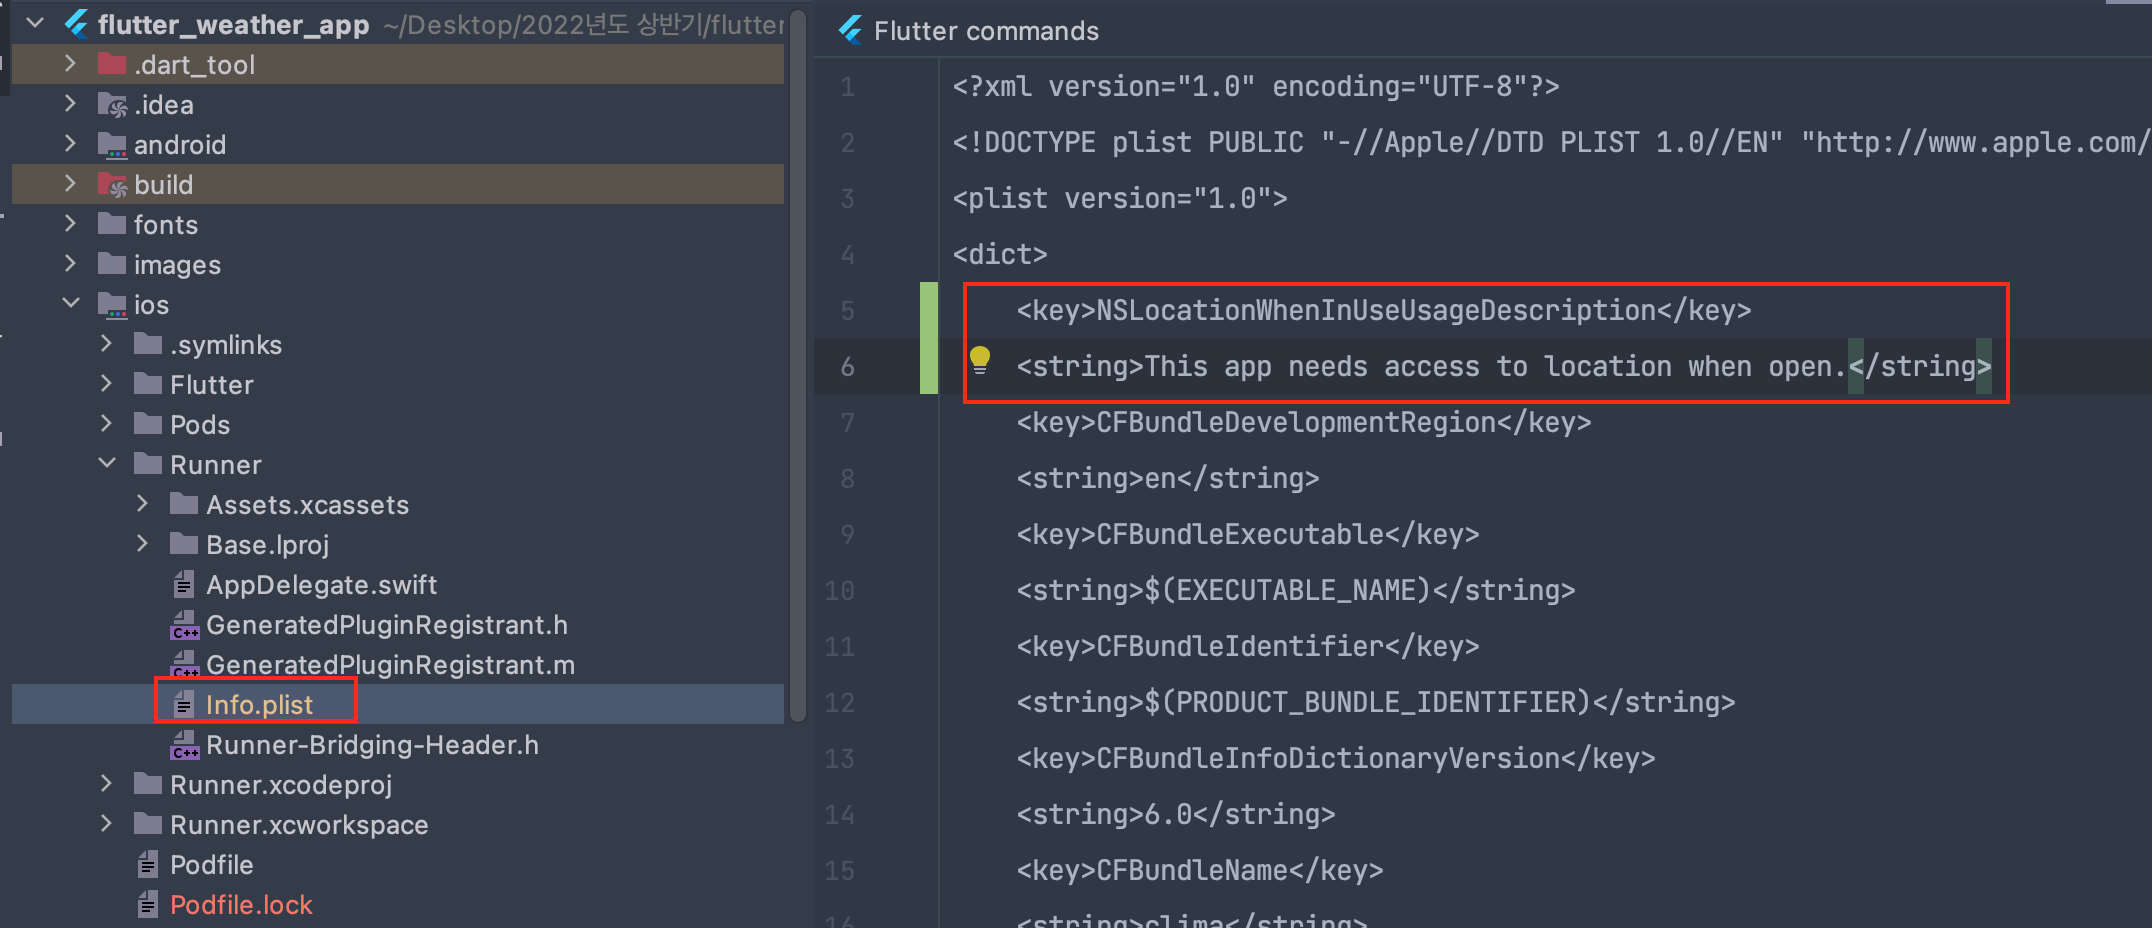
ios 폴더에서 info.plist파일 안에 <dict> 태그 안에 다음과 같이 추가 한다.
<key>NSLocationWhenInUseUsageDescription</key>
<string>This app needs access to location when open.</string>
getLocation() 사용

오류수정
예전 프로젝트를 다운 받다보니 migration이 필요했다. 다음 영상을 보고 해결했다.
https://www.youtube.com/watch?v=Qu7afHmErAs
permission 구하는데 제대로 동작을 안해서 다음과 같이 코드를 추가했다.

아래와 같이 이제는 위치 정보를 잘 불러온다.

동기와 비동기 차이
void aFunction(){
//step1
print('hello moon');
//step2
syncLoad('image from NASA');
//setp3
print ('hello jupiter');
}
동기일 때는 두번째 이미지가 클 경우, 계속 기다렸다가 이미지가 다 로드 되고나서야 step3가 실행된다.
비동기일때는 step2를 기다릴 필요 없이 동시에 step3가 진행된다.
Widget LifeCycle
한마디로 코드를 언제 발동시킬지와 연관이 되어있다.
void initState(){

}

Widget build(BuildContext context){
	return null;
}

void deacivate(){

}
initState 같은 경우 state가 처음 나올 때 발동. 처음에만 나왔으면 좋겠는 것은 여기에 넣는다.
build 위젯 같은 경우 위젯이 실제 만들어질 때 발동된다. state가 바뀔 때 마다 다시 build 된다. 계속 state가 바뀌는 친구들은 여기에 넣는다.
deactivate 같은 경우 stateful widget이 소멸될때 발동된다. (예를들어화면 넘어갈때 )

이런식으로 getLocation() 함수가 UI가 생기자마자 발동되게 만들어주었다.
예외처리
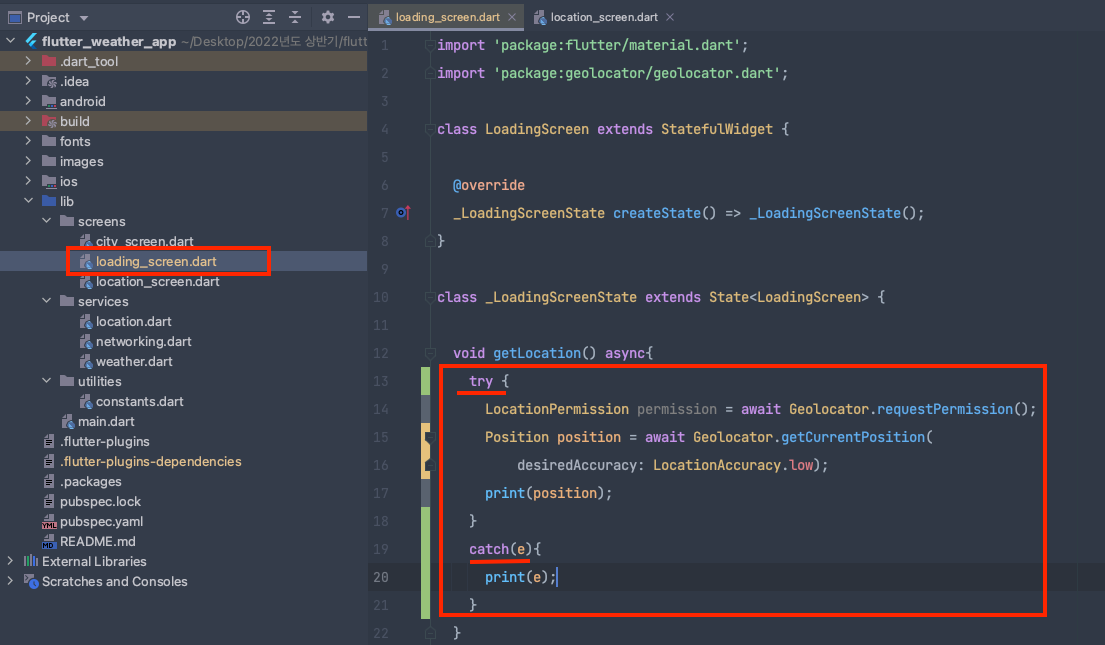
try, catch 구문을 이용하여 현재 위치를 불러오는데 실패했을때 에러를 잡아주도록 설정해주었다.
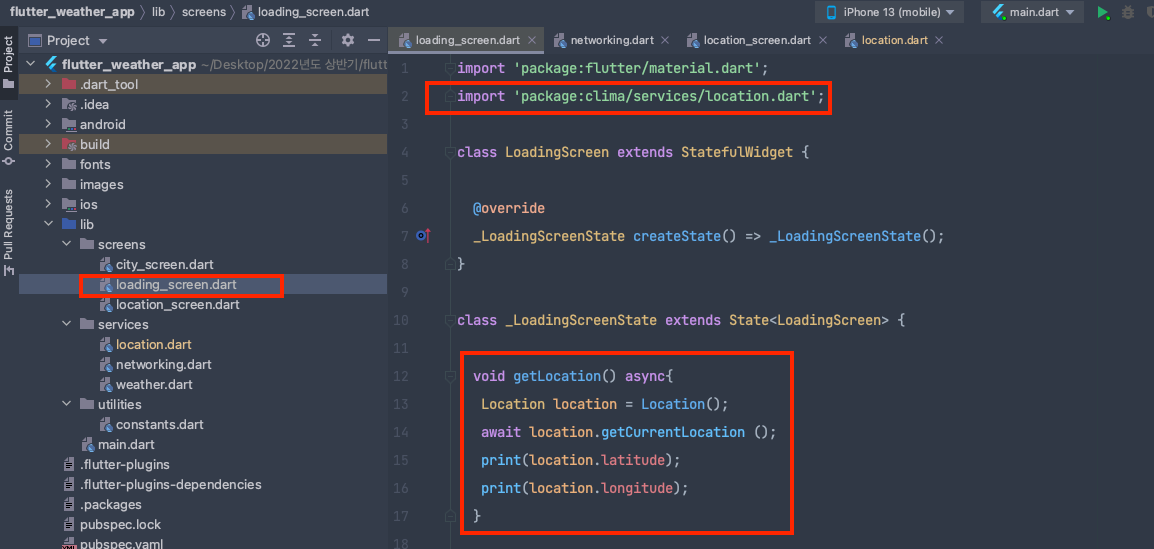
location.dart 분리 및 리펙토링

다음과 같이 적어주었다. 조금 이해가 안가는 부분은 double 부분과 class Location 만들어준 부분.
그리고 Future <void> 도 궁금했다.
Flutter에서 숫자 타입에는 두가지 종류가 있다. int는 정수형, double은 실수형이다.
future는 promise와 유사하다. 싱글 스레드 환경에서(순차실행) 비동기 처리를 위해 존재한다.
https://velog.io/@jintak0401/FlutterDart-%EC%97%90%EC%84%9C%EC%9D%98-Future-asyncawait
Flutter/Dart 에서의 Future, async/await
Flutter 와 Dart 를 공부하면서 깨달은 Future, async / await 에 대한 설명과 고민에 대한 답을 작성한 포스트입니다.
velog.io
날씨 API 받아오기
API (application programming interface)
a set of commands, functions, protocols, and objects that programmers can use to create software or interact with an external system
소프트웨어를 만드는 예시: flutter
외부 시스템과 상호작용 : request를 key와 함께 하면 response를 받는다. 여기서 은행 직원이 api에 해당한다.
날씨 api 링크
https://openweathermap.org/api
Weather API - OpenWeatherMap
Please, sign up to use our fast and easy-to-work weather APIs for free. In case your requirements go beyond our freemium account conditions, you may check the entire list of our subscription plans. You can read the How to Start guide and enjoy using our po
openweathermap.org
http package 이용하기

puspec.yaml 파일안에 http: ^0.13.4를 추가해주었다. 반드시 pub get도 해주자.

그리고 loading_screen.dart 파일안에 다음 아래 코드를 넣어준다.
import 'package:http/http.dart' as http;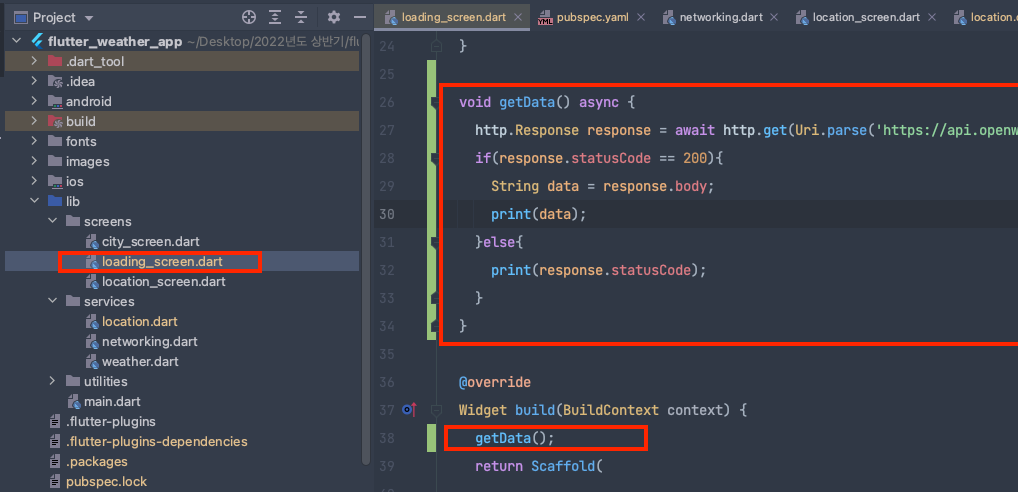
http.Response, http.get으로 한 이유는 코드를 보았을 때 어디서 가지고 오는지 명확하게 표시하기 위함이다.
http.get(Uri.parse(url이 들어가면 됨))
statusCode가 200일 때는 data에 내용을 담고, 아닐 때는 statusCode가 몇인지 출력하도록 간단히 테스트 코드를 작성했다.
JSON
api에 대한 응답은 크게 두가지로 받는다. 하나는 xml, 하나는 json이 있다.
//xml 예시

<key> value </key>
//JSON 예시
{key: value}
다음과 같이 JSON파일 형식으로 정의가 되어있다.
var wardrobe = {
	doors:2,
	drawers:2,
	colour: 'red'
}
다음과 같은 예시에서 인터넷 사이에 데이터를 주고 받으려면 어떻게 형식을 줄일 수 있을까?
"{doors:2, drawers:2, colour: "red"}"이런식으로 바꾼다음, 실제 다시 api 수신해서 받아올때는 원래의 형태로 만들 것이다.
API, JSON 변환 후 데이터 읽어오기

우선 JSON 파일을 읽어오려면 dart:convert 패키지를 이용해야 한다.
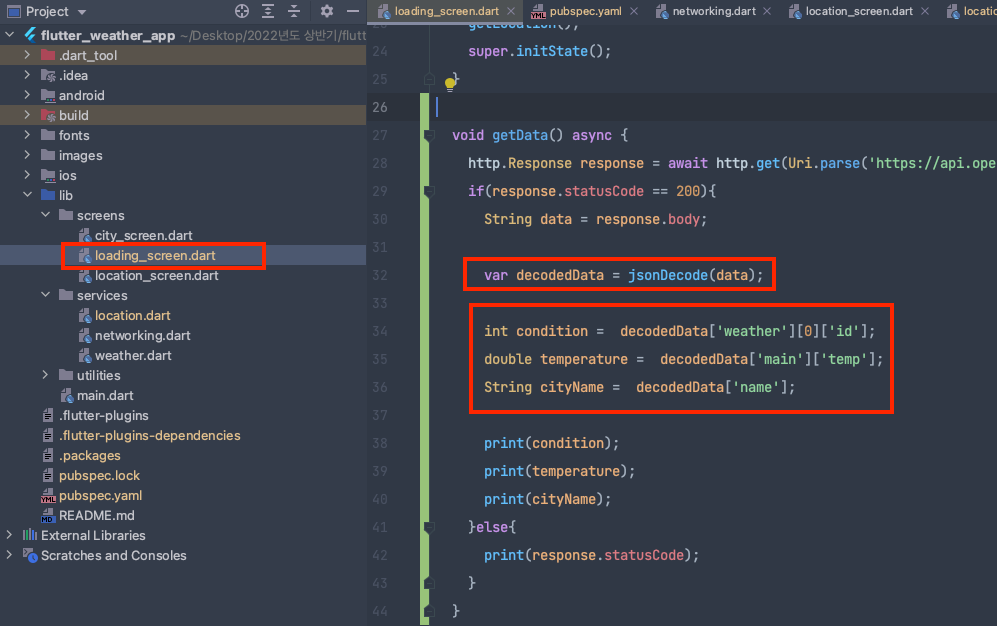
우선 jsonDecode(data) 부분이 계속 중복되기에 deocdedData라는 변수로 하나 만들어서 담아주었다.
var로 담은 이유는 data에 어떤 형태가 담길지 모르기 때문에 dynamic으로 해주기 위함이다.
나머지는 명확하게 하기 위해, int, double, String 같은 static으로 해주었다.
읽어오는 방법은 [' ']를 이용하고, list인 경우는 순서를 알려주어야 한다.
latitude, longitude 변수 할당 후 실제 써주기
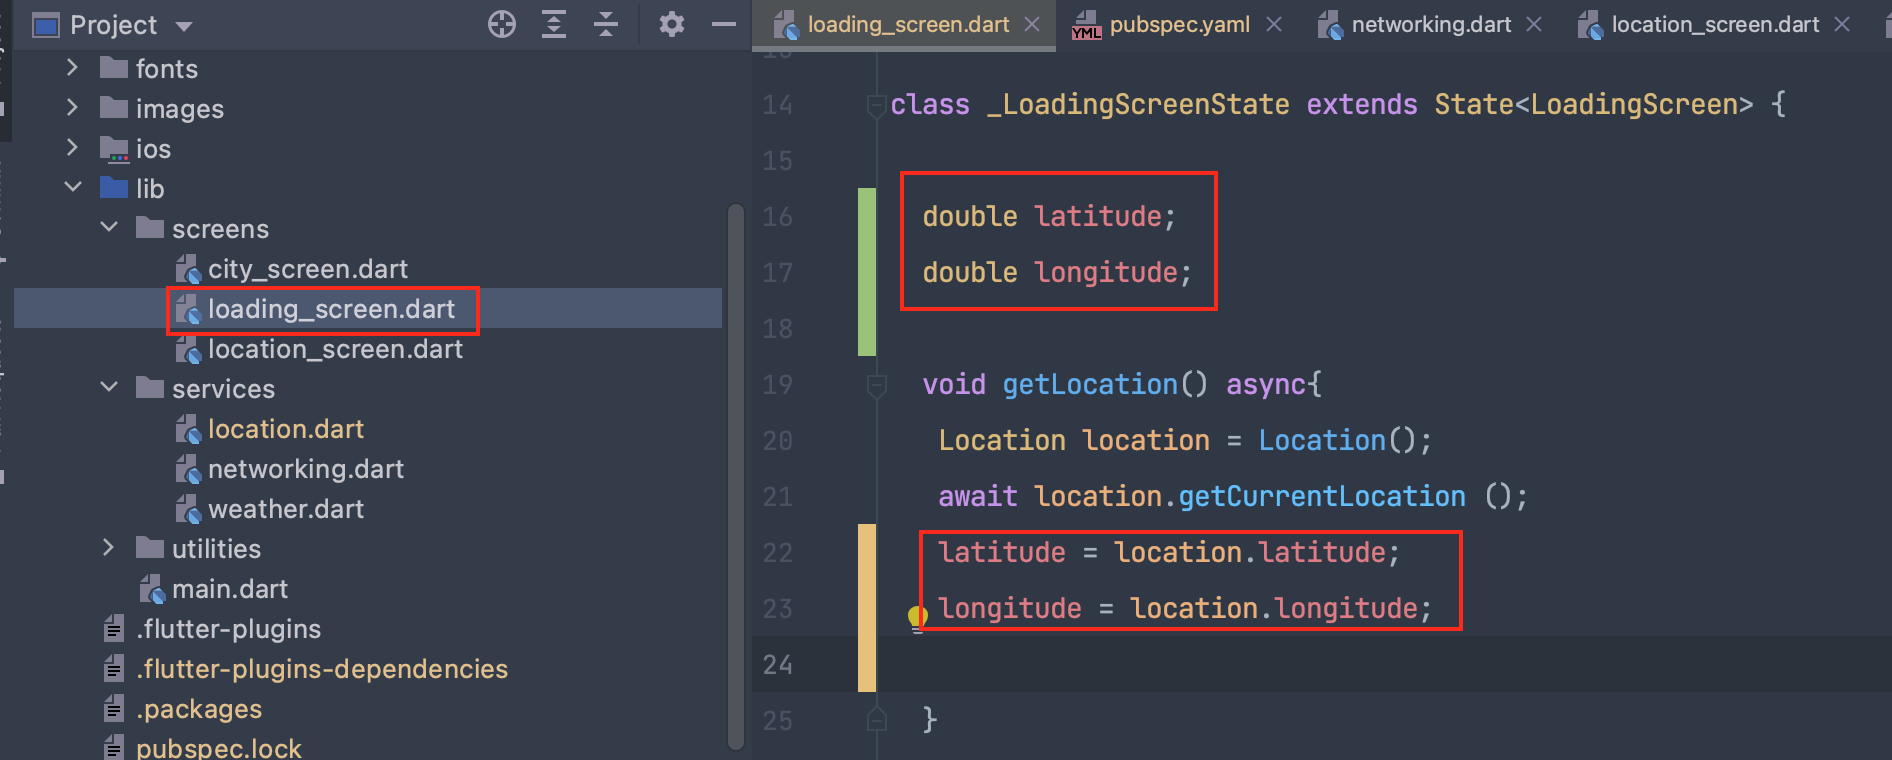
latitude, longitude 변수를 선언해주고, location에서 가져온 정보를 넣어준다.
http.Response response = await http.get(Uri.parse('https://api.openweathermap.org/data/2.5/weather?lat=$latitude&lon=$longitude&appid=api키'));이런식으로 $를 이용하여 변수값을 넣어준다.
networking.dart 분리 및 추상화
import 'package:http/http.dart' as http;
import 'dart:convert';

class NetworkHelper {

  NetworkHelper(this.url);

  final String url;

  Future getData() async {
    http.Response response = await http.get(Uri.parse(url));
    if (response.statusCode == 200) {
      String data = response.body;

      return jsonDecode(data);

    }
    else {
      print(response.statusCode);
    }
  }
}
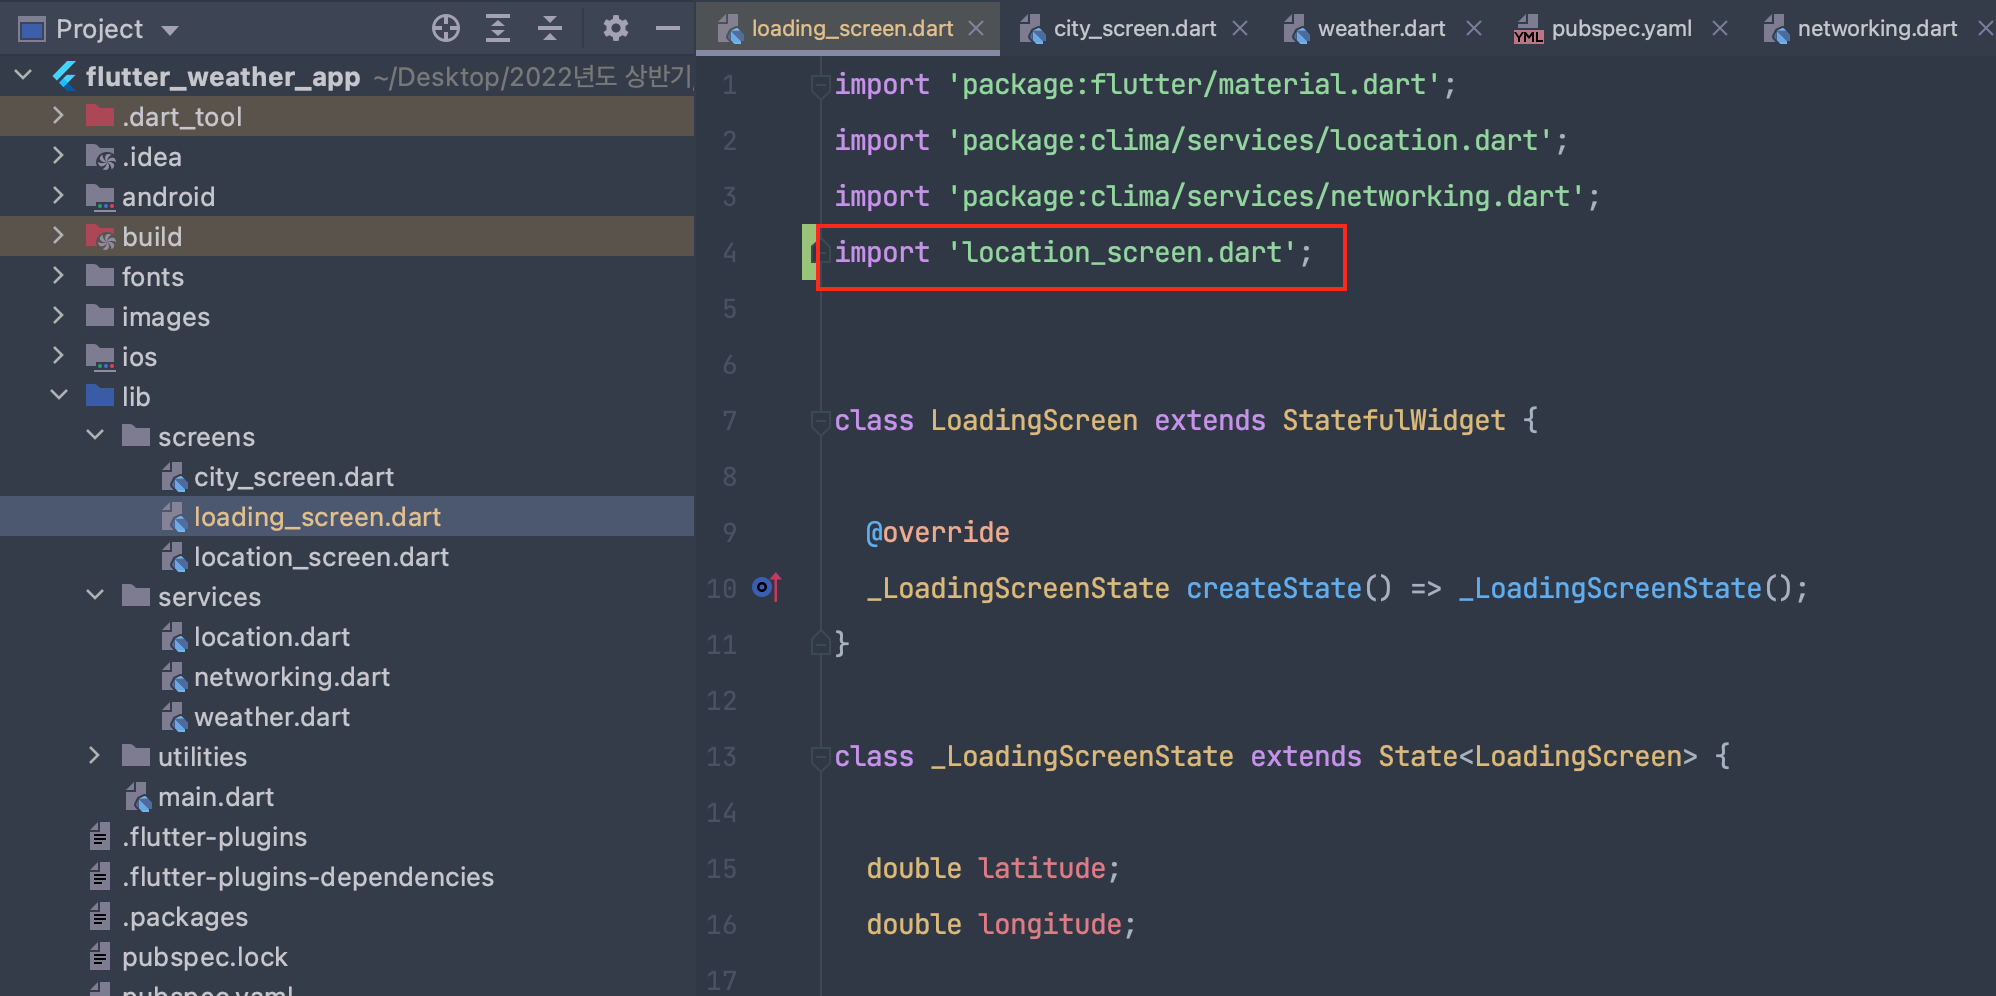
location_screen.dart 파일을 불러와주고


이는 로케이션 스크린에 Navigator를 푸쉬하기 위함이다.
Loading Screen 만들어주기
https://pub.dev/packages/flutter_spinkit
flutter_spinkit | Flutter Package
A collection of loading indicators animated with flutter. Heavily inspired by @tobiasahlin's SpinKit.
pub.dev
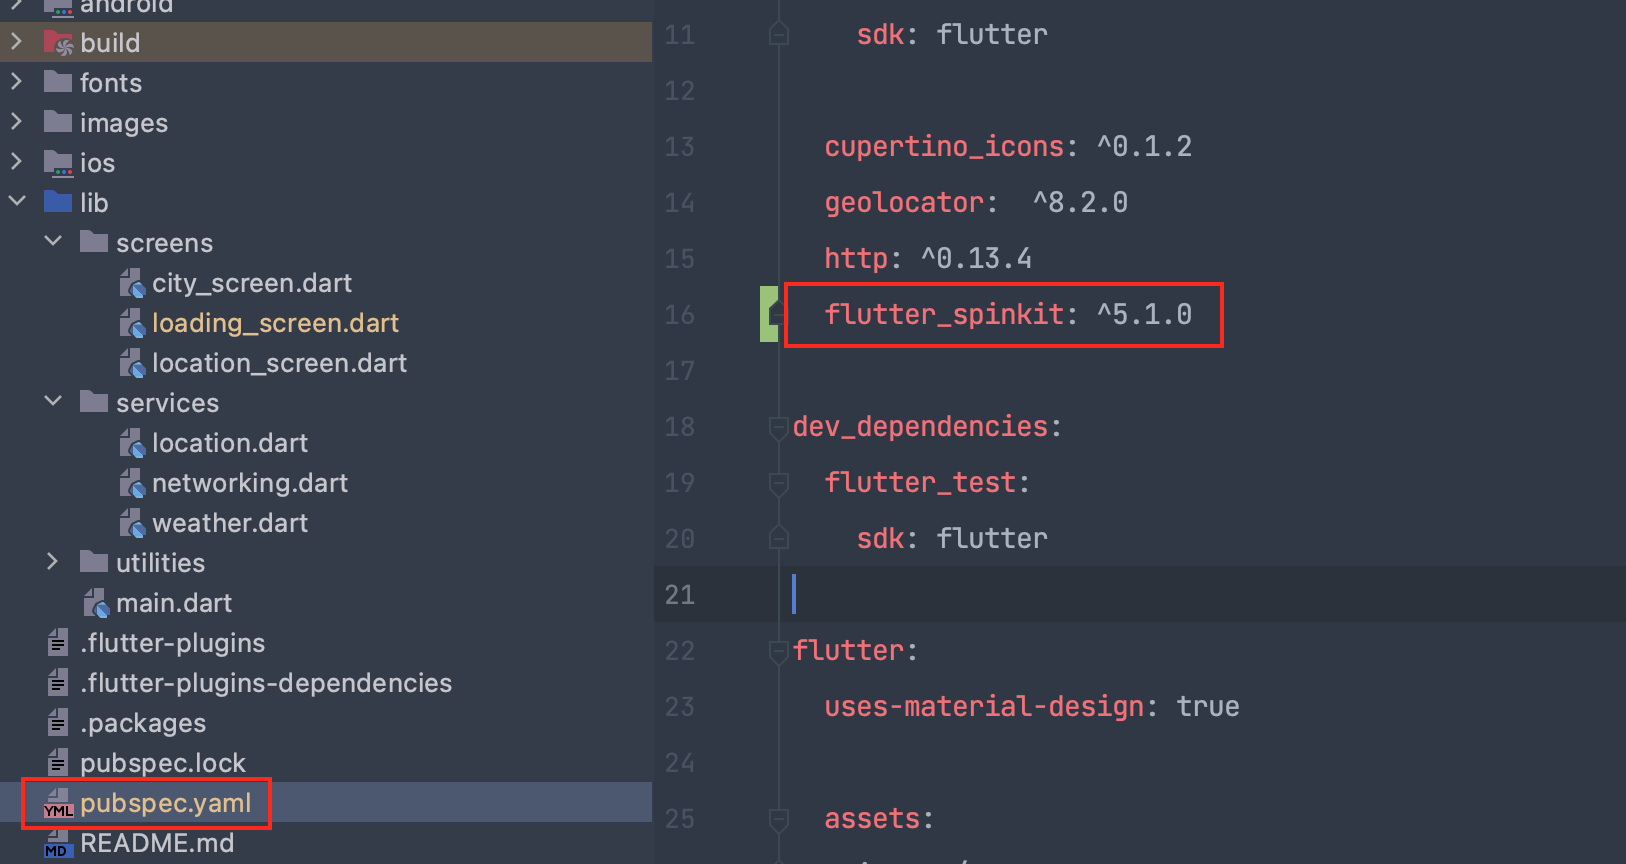
pubscpec.yaml 파일에서 dependencies에 다음과 같이 추가한다.
flutter_spinkit: ^5.1.0

loading_screen.dart 파일안에서 Scaffold안에 넣어주도록 하자.
 child: SpinKitDoubleBounce(
          color: Colors.white,
          size: 100.0,
          )
State Object에 데이터 전달하기


updateUI 함수 만들기


온도를 섭씨 단위로 바꿔주기
apiKey 뒤에 하단과 같이 추가하여 단위를 바꿀 수 있다.
&units=metric
temperature UI에 표시하기
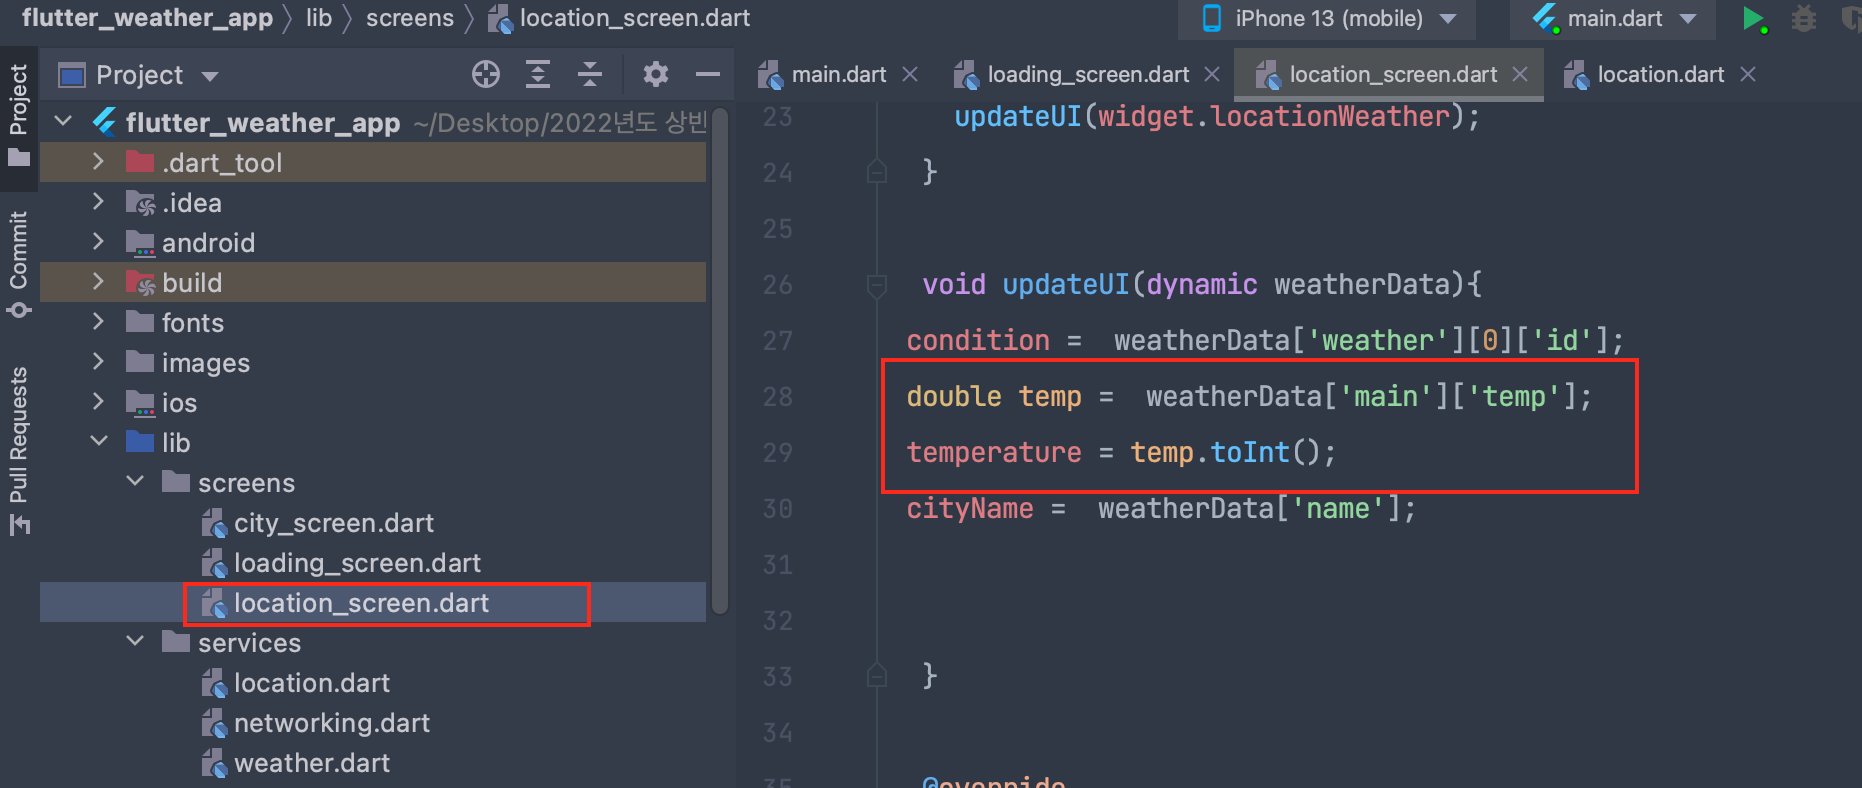
12.44 와 같이 뒤에 소수점도 나오기에 이를 정수형으로 바꿔주었다.

로딩스크린 안쓰는 변수 정리

한번 더 진입하고 싶을 때는 ${}를 쓰면 된다.
'🕊 Flutter > 강의' 카테고리의 다른 글
| 주사위 어플 만들기 (0) | 2022.04.08 |
|---|---|
| 6강 Typography와 Layout 만드는 법 (0) | 2022.03.16 |
| 5강 Flutter 박스 디자인 하는 법 (0) | 2022.03.09 |
| 4강 기본 앱 레이아웃 만드는 법 (0) | 2022.03.08 |
| 3강 Flutter 기본 위젯 넣는 법 (0) | 2022.03.06 |